A secondary channel is used to add design features like laybys and parking bays to the the side of a road or footpath. In particular this is used where the grade of the feature is different to that of the main road carriageway (for example, where a parking bay's grade falls to the primary channel) or where the feature has an upstand (small kerb) at the join with the primary channel. The secondary channel defines the shape of the design feature.
You can add a new secondary channel from the ![]() secondary channels toolbar.
secondary channels toolbar.
After pressing the ![]() Add Secondary Channel button you will see the following message appear on the right of the toolbar indicating that you should select a channel or footway:
Add Secondary Channel button you will see the following message appear on the right of the toolbar indicating that you should select a channel or footway:
You can now select which road channel or secondary channel onto which you want to add the new secondary channel. As you move the mouse over the drawing the channel or secondary channel closest to the cursor will highlight. Click the mouse to select the desired item.
You will then see this toolbar with the options for adding the new secondary channel.


The tools for designing a secondary channel are the same as those for primary channels.
![]() Add parallel item
Add parallel item
![]() Add widening or narrowing
Add widening or narrowing
![]() Add mitre item
Add mitre item
![]() Edit Channel/Footpath item
Edit Channel/Footpath item
![]() Delete channel item
Delete channel item
![]() Finish and apply the items
Finish and apply the items
![]() Click this button to close the toolbar
Click this button to close the toolbar
When you have completed the secondary channel horizontal design, click the ![]() Finish and apply the items button. You will then be presented with the following window for the vertical options:
Finish and apply the items button. You will then be presented with the following window for the vertical options:
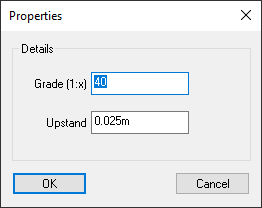
These options are described on the Secondary Channel Properties page.