To access the tools for houses click the ![]() button.
button.
You will see this toolbar appear on the top left of the plan view window:


Note: The big ![]() button indicates which type of options the toolbar is for.
Moving the mouse over this big button also restores the visibility of the toolbar when it has hidden itself (The toolbar may slide out of view after a period of inactivity).
button indicates which type of options the toolbar is for.
Moving the mouse over this big button also restores the visibility of the toolbar when it has hidden itself (The toolbar may slide out of view after a period of inactivity).
Note: If no houses have yet been added to the design model then all the options will be inactive, except for the Add House button.
![]() Add House
Add House
![]() Move House
Move House
![]() Rotate House
Rotate House
![]() Set House Level
Set House Level
![]() Level House To Surface
Level House To Surface
![]() Level Access
Level Access
![]() Delete House
Delete House
![]() Add House External level
Add House External level
![]() Delete House External Level
Delete House External Level
![]() Edit House Item Properties
Edit House Item Properties
![]() Add Footpath
Add Footpath
![]() Building Pad Plot Renumber
Building Pad Plot Renumber
![]() Add Building Pad Setting Out Table
Add Building Pad Setting Out Table
![]() Building Pad Setting Out Properties
Building Pad Setting Out Properties
![]() Delete Building Pad Setting Out Table
Delete Building Pad Setting Out Table
![]() House Manager
House Manager
![]() New House Template
New House Template
![]() Edit House Template
Edit House Template
![]() Click this button to close the toolbar
Click this button to close the toolbar
The Add House button brings up the House Definitions window where you can insert an existing building template into the model or create a new building template.
An alphabetically ordered list of the building templates in the project will be shown. By default, the first building in the list is selected. Clicking one of the other building templates will change the selection.
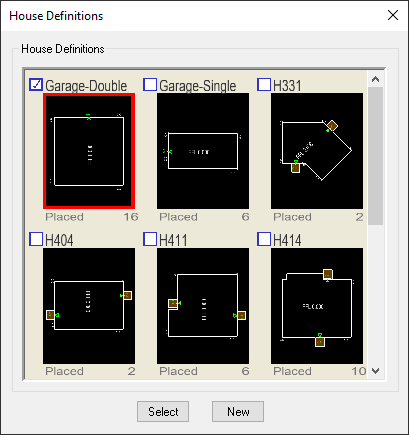
Pressing the Select button will pick the highlighted building for insertion and allow you to place it on your drawing.
The New button closes the window and brings up the house template tools. You can then create a new building template in the plan view.
Note: Building templates can also be loaded from another project file or from a house library file. These can be imported using the House Manager.
When adding or moving a house, a preview of the house outline will move with the cursor as you move the mouse. You can use the snap tools and the construction line tools for accurate positioning.
From the right-click menu you can Rotate or Mirror/Flip the house insert, or select Change House Type to insert a different house template:
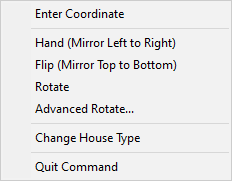
By default a house is inserted at the same rotation as the template. You can use the Rotate House option to rotate the house insert to any angle.
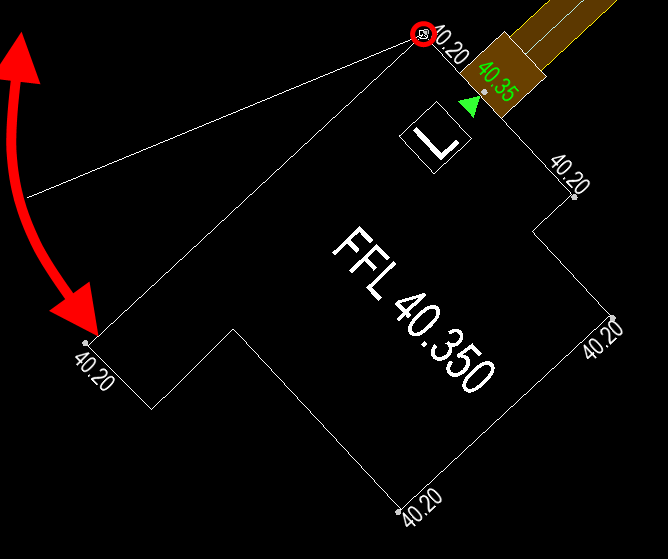
Using the rotate option, first choose a house insert to rotate by left clicking on it, then indicate a rotate origin point (the point around which the house will rotate). This can be any point on the screen but you will probably want to snap to a point on the house wall.
The rotate tool will now be waiting for you to pick a reference angle by clicking another point. Again this can be any point on the screen, but you may want to snap to a point or line. Once picked, moving the mouse will show a preview of where the house insert will be rotated to when you click again.
If you right click, you can choose the Rotate option which will show the window below. This option is useful if you know an exact angle you wish to rotate by.
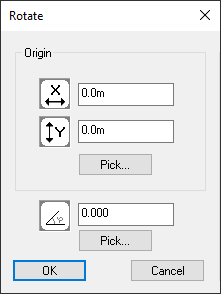
You can type in (or pick with the mouse) a rotation origin (the point around which the house will rotate) and you can also type in (or pick with the mouse) a rotation angle.
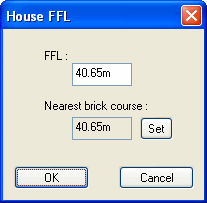
By default a house is inserted at the ground level at its initial location. You can use the Level House option to set the FFL (finished floor level) to any value.
As you type in a new FFL, the nearest brick course level will update. Click "Set" if you wish to use the nearest brick course level in preference to the level typed in. The datum for the nearest brick course is zero.
By default a house is inserted at the ground level at its initial location. If the house is moved horizontally or if you simply want to reset the FFL back to default ground level you can use the Level House To Surface option to set the FFL (finished floor level) back to the ground level.
This tool will set the FFL of the building to a level that achieves an access path gradient no greater than 1 in 20.
At least one access path must be connected to a door on the building in order to calculate the level access FFL.
The building FFL is rounded to the nearest site brick course level, unless that would exceed the 1:20 gradient due to the path being very short.
Use the Delete House to remove a house from the drawing. As you move the mouse on the plan drawing, the nearest house will highlight. Click to delete the highlighted house.
Note: The deleted house type is still available for adding again from the list of house templates. Use the House Manager if you want to delete an unused house template.
This option allows you to add additional external level points around the edge of a particular building pad.
First choose the position for the external level point. You will see the position snapping to house outer wall nearest to the mouse position. Click the mouse to select the position. Then enter the properties of the external level point:
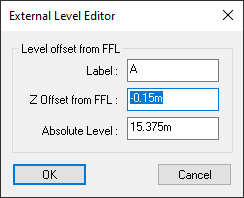
You can specify the level offset relative to the FFL (finished floor level), or you can give the absolute level.
The external house level will affect whether there will be exposed brickwork on the outer wall due to a low ground level, or if tanking needs to be installed where the ground level is higher. Exposed brickwork and tanking regions will be indicated on the plan drawing with hatching and annotation of the number of courses of brickwork affected.
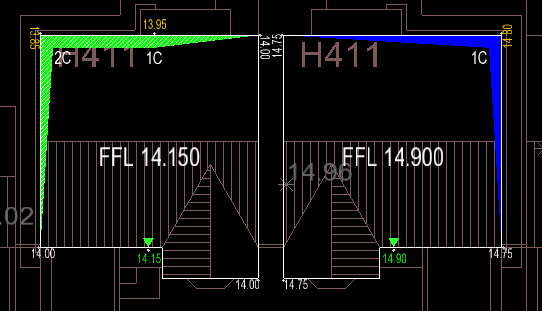
In this example, the house on the left has exposed brickwork indicated by the green and white hatched region, up to two brick courses deep. The house on the right has tanking indicated by the blue hatch region, up to one brick course deep.
Use this option to remove an additional external level from a specific building. You can only remove the levels that were added with the Add External Level option.
Note: This option will not remove those external levels which are defined in the house's template. Edit the house template if you need to do that.
Use this option to modify the properties of external levels, doors or service connections within any house on the drawing.
Any editable item within a house will highlight as you move the mouse near. Click to select the item and modify its properties.
Use this option to add or reset a footpath to a house front door or garage door. The path will extend straight out from the building pad in the direction of the door until it junctions to a road footway or footpath. If there are no nearby roads or footpaths this will instead create a short stub of a footpath which can then be move to its desired location.
Once added, you can use the centreline tools to edit this footpath as you would for any other footpath/cycleway.
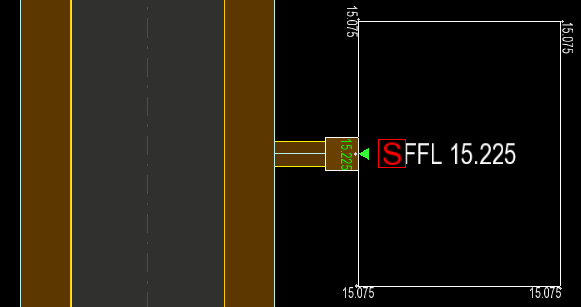
When a house footpath is added to a front door, a symbol will be added showing either L, R, or S, indicating the approach is either level access, ramped, or stepped. This is based on the requirements specified in The Building Regulations Approved Document M, Access to and use of buildings.
An [L] symbol indicates that the gradient is level or gently sloping, indicating a gradient is less than or equal to 1 in 20.
An [R] symbol indicates that the path could be ramped. This means that the path can be created as one or more ramps that satisfy the following conditions:
An [S] symbol indicates that the path must be stepped because it does not satisfy either the level access or ramped access requirements.
If the L/R/S symbol is drawn in red (as shown in image above) it means that the house footpath slopes towards the house which could be an issue if the road floods for what ever reason.
Note: An R or S symbol indicates that an access path could be ramped or stepped access based on the above requirements. The engineer still needs to design the vertical alignment of the path to ensure that the requirements are met.
This tool allows you to quickly set the plot names/numbers of inserted building pads. The plot name/number is used for the title of building pad setting out tables and can also be added as an annotation of the building pad.
After activating this tool you should see the following toolbar below the Building Pad Tools:
By default the number will be selected allowing you to type in a new house name / number if required. You can also change the prefix if desired for an alternative naming scheme. For the above example the full building pad name will be "Plot 1".
You can then click on any inserted building pad to set the name of the selected building pad. The plot number will then automatically increment, allowing you to keep clicking on building pads to set the house numbers sequentially.
After a plot name has been set on a building pad this will be displayed in the bottom left corner of the building pad while this tool is active:
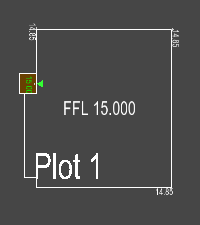
After closing the tool this will no longer be displayed. To add this as a permanent annotation you can edit the building pad template, and use the Add Annotation tool to add a "Plot Number" annotation to the template.
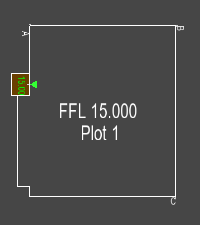
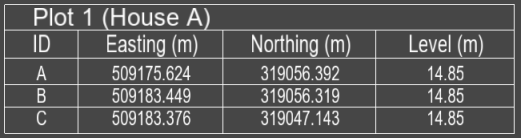
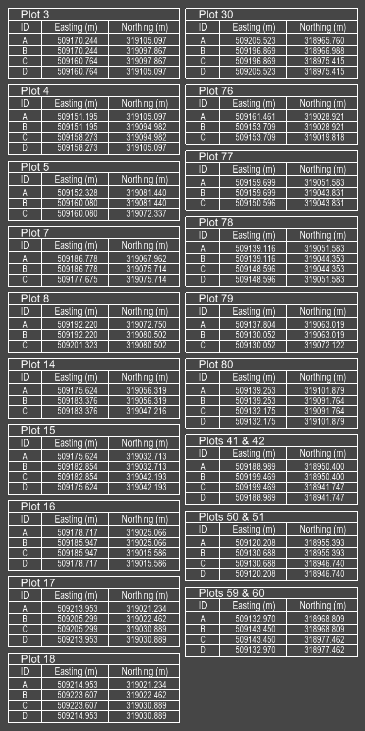
The plot name is also used as the title for the building pad setting out tables:
Press this button to add a building pad setting out table to the project.
After pressing the button an outline box is shown next to the cursor, indicating the size of the setting out table. Move the cursor to where you want to place the table and then click to place it.
This button is enabled after placing a building pad setting out table somewhere within the project.
Pressing this button will bring up the building pad setting out properties window where you can change the setting out point label style and table settings.
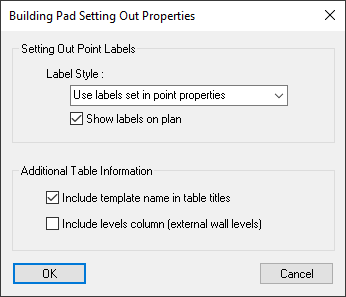
Use labels set in point properties
The labels that are stored in the properties of each external wall point are used.

You can set the label text by editing the building pad template and then using the template tools, Edit Item tool, and selecting an external wall item to edit in the template. Or, you can set a specific label on a placed building pad using the Edit Item tool, which will override the label set in the template.
The points are ordered ascending alphabetically and by label length, with longer labels appearing after shorter labels. For example, the following label examples are shown in the order they would appear in the table: "A","B","C","AB","BC","ABC". By editing the label text of the points you can change the ordering they appear in the table.
Sequential Numbers (per insert)
Each inserted building pad will have the external wall points numbered sequentially starting from 1.

The label style does not affect the ordering of the points, this is still based on the labels set in the external wall level item properties as explained in the "Use labels set in point properties" style.
Sequential Numbers (global)
This mostly works as specified for the "Sequential Numbers (per insert)" setting. However, the numbering continues from the previous table instead of resetting back to 1 for each building pad.
The ordering of the tables is based on the plot name/number ordering of the inserts. This can be set quickly using the Plot Renumbering tool.
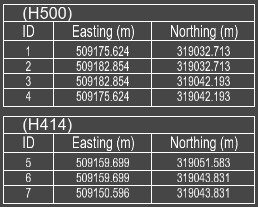
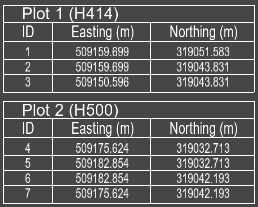
The example image below shows the same information as before but the order of the tables has been changed by assigning a lower plot number to the house based on the H414 template:
If ticked the plan view will shows the label annotations at each setting-out point on the house, matching the labels shown in the setting out table. When unticked the external wall level is shown instead.
Toggles whether or not the template name of each building pad is shown as part of the title.
Note: if no plot names/numbers has been set for a building pad this option will result in the related setting out table not having a title.
Toggles whether or not the levels column is included in the table. With this enabled there will be a "Levels" column in each table which annotates the external wall level of each point.
This button is enabled after placing a building pad setting out table somewhere within the project.
Pressing this button will remove the table from the project.
Use this option when you wish to delete any unreferenced house definitions or import new house definitions from another file or house type library.
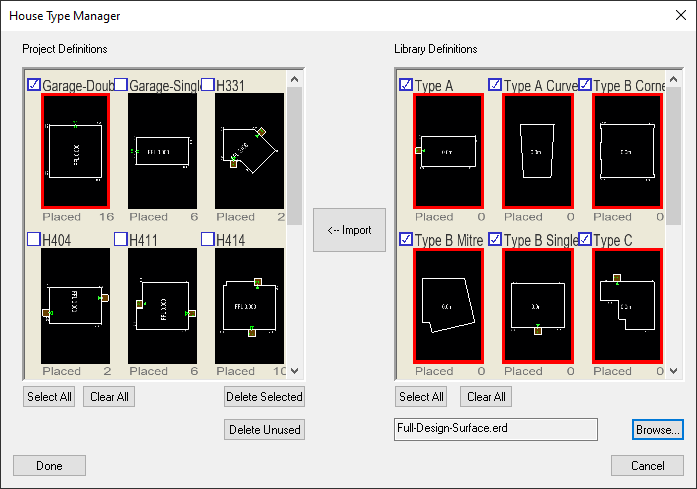
The left hand house definition list shows all house definitions that are currently within the active drawing.
The right hand list shows all house definitions within another project or a library file. Press the Browse button to choose an ERD file or house type library.
Both lists have a Select All and Clear All button which tick or untick every definition within the specified list.
Using the Delete button you can remove selected (ticked) definitions from the Project Definitions list.
Note: Deleting a house template from the project means that it is no longer available for adding houses of that type onto the drawing.
Note: You cannot delete a template if there are currently houses of that type inserted on the drawing.
The Browse option allows you to import house templates from another project file or from a house library. A file selection window is shown for you to select a project file (*.ERD) or a house library file (*.EHL):
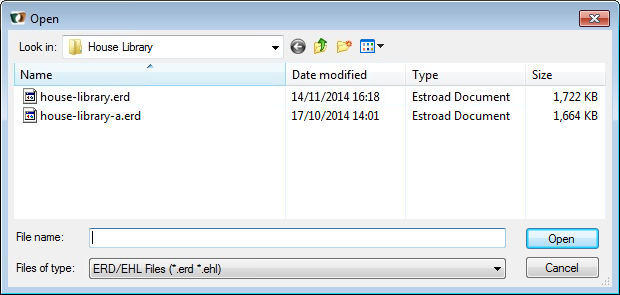
After selecting a file the library definitions will show which templates can be imported from this file.
By default all the house definitions in the chosen file are selected, and you can de-select any that you don't want to import.
When you're happy with your selection in the Library Definitions list, click the Import button to load the house templates into your project. They will appear in the list on the left-side of the window once imported.