Site3D has multiple backup mechanisms in place to minimise the potential loss of data:
By default all of the backup files are located in the same folder as the project file.
If you have the AutoSaveToLocalDrive setting enabled in your Global settings, the autosave backup file will instead be saved into your appdata folder on your local PC.
This can be found by clicking in the address bar of Windows File Explorer, typing %appdata%\Site3D, and then pressing the Enter key.
This option does not affect the save location of the EBK or TMP files.
If you are working on projects that are stored across a network and you have an unreliable connection to the project folder we would recommend using the AutoSaveToLocalDrive option.
The autosave file also doubles as a 'lock file' and is stored in the project folder. When you initially open a Site3D project file a preliminary autosave file is generated with no backup data in it, this functions as a lock file. The lock file is always generated in the project folder even with the AutoSaveToLocalDrive option enabled.
This locking mechanism will show a message about the project being in use if a second person opens a project file that is currently being worked on. The purpose of locking the file is to prevent a loss of work scenario which could be caused by having two people simultaneously working on a single project file and then both saving back to the same file, this scenario would cause one person to accidentally overwrite all of the work the other has done.
Because an autosave file also doubles as a lock file, you could potentially see a project file showing as being in use by another user when they do not currently have the project open. This can happen when the named user has an autosave recovery option available for the project file. The project is kept in the locked state to prevent loss of data in case the autosave data is more up to date. The named user should open the project file where they can then choose a recovery option, after making a decision on this they can close the project normally and this will clear the lock.
The lock can be manually removed by deleting the associated autosave file, but as noted above this could result in lost work if the lock is held due to valid autosave data. So, before deleting the file you may want to check its contents by creating a copy of it, following the steps in the Manual Recovery of Autosave Files section.
The recovery files are generally hidden from view in the project folder, so that they do not distract from your day-to-day work. In order to see what recovery files may be available you should turn on the option to see the hidden files in Windows File Explorer. To do this in Windows 10, select the View tab in Windows Explorer, and select both the 'File name extensions' and 'Hidden items' options:

Site3D implements an autosave system which saves a copy of the project at a regular interval. The default autosave interval is 5 minutes, meaning that the most work you might ever lose is five minutes worth.
NOTE: You can specify how often the automatic saving occurs on the Project Options window, or for all projects with the Tools->Options facility.
The autosave file is used to automatically offer you a recovery file in the situation that Site3D detects that a project you were working on was not able to close down cleanly, for example from an unexpected shutdown.
At start-up and when you open a project file Site3D will detect if there is a recovery file (indicating that some disaster may have previously occurred preventing normal saving of the project). In this case you will be offered the choice of recovering the project.
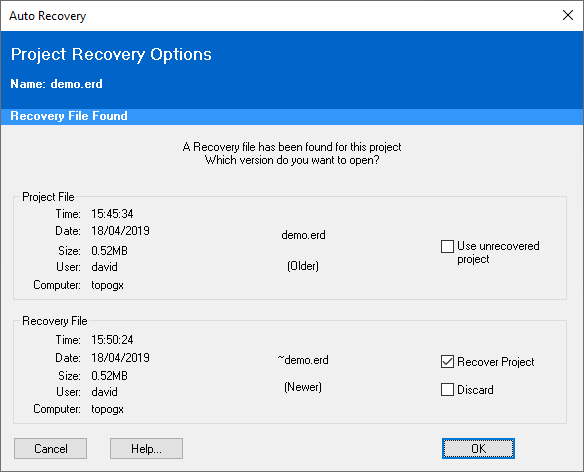
The Auto-Recovery window shows details of the recovery file (date and time it was saved, size, who was using it and on which machine), and also details of the original project file (if it is present). Based on this information, you can choose whether to recover the project from the auto-saved file, or to use the original project file.
Usually, the newer of the two files will contain the more up-to-date version of the project. But, if the computer failed halfway through saving a project, you might notice one file being much smaller than the other, and then you could choose to use the larger of the two.
You will see that one choice is already ticked. This is the one that the software has determined is likely to be the better file to use. But you should use your knowledge of the particular circumstances to make the choice.
Selecting the Recover project (and clicking the OK button) will cause the software to recover the project and display it on-screen.
After the recovered project opens you should save ![]() in your desired folder location if you want to keep the recovered project.
in your desired folder location if you want to keep the recovered project.
If you select the Use unrecovered project option (and click the OK button), the original project file will be opened rather than the recovery file.
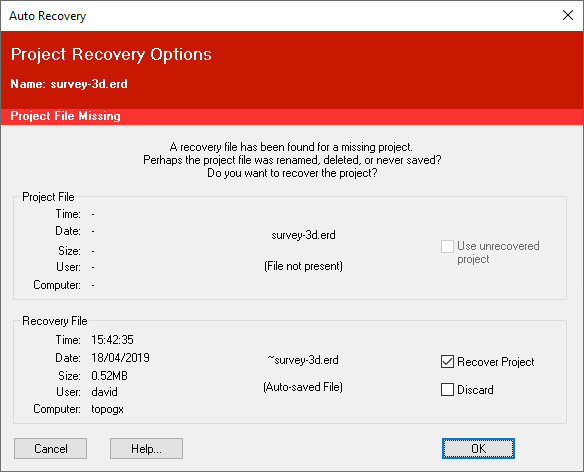
Note: This option is unavailable when the original project file appears to be missing, e.g. if the original project was deleted or moved to a different folder location, or if the project was never saved before the failure occurred (see Missing Project File below).
If you choose not to recover the project (by selecting the Cancel button), then the project will still be offered for recovery the next time you start the software.
If you really want to discard a recovery project to prevent this from being offered in the future, you can select the Discard option. You will be asked to confirm your choice to discard the recovery project.
Sometimes it may be found that the original project file is not present at all. For example, this could occur if you had started a new project and a failure had occurred before you had saved it for the first time. In this case, the project recovery will be offered as soon as you start the software again on the same computer.
Autosave files have the same name as the project file but with a '~' in front of the filename.
For example, if the project file is MyProject.erd then the auto-save file will be called ~MyProject.erd.
Should you wish to load the auto-save file independently of the auto-recovery facility, simply rename the auto-save file to something other than the project file name, without the '~' prefix, and open it as normal.
NOTE: The autosave files are normally hidden from view, check the Hidden Recovery Files section for more information.
If you select the Recover Project option on the Auto Recovery window, the project file will be updated to the selected autosave file. The previous manually saved version of the project file will be saved with the same name but with a .TMP file extension.
Should you find that the recovered project is not what you want, you can revert back to the previous manually saved version of the project file by using Windows Explorer to rename the '.TMP' file back to a '.ERD' file. You can then open this as a standard project file in Site3D.
NOTE: The '.TMP' files are normally hidden from view, check the Hidden Recovery Files section for more information.
A copy of the last full save is kept every time you do a standard save in Site3D which would overwrite the project file. This copy will have the same name as the project but with a '.EBK' file extension.
You can revert back to the previously saved version of the project file by using Windows Explorer to rename the '.EBK' file to a '.ERD' file. You can then open this as a standard project file in Site3D.
NOTE: The '.EBK' files are normally hidden from view, check the Hidden Recovery Files section for more information.
Loss of network connection while saving to a network location can result in an incomplete file being written out. Site3D will wait and attempt to finish saving once the network connection is re-established. If you are unable to regain a connection the file will remain incomplete.
Opening a Site3D project file that is incomplete will automatically bring up the following window, providing an option to attempt to recover as much of the valid design model and imported drawings as possible:
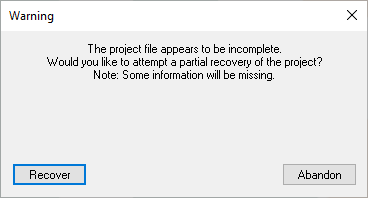
Minimally, to be able to recover anything from an incomplete file, the design model portion of the file must have been completely written to the file and must be valid. This is one of the first parts of the file that gets written and is also fairly compact, so in a lot of situations the design model will be fully recoverable and you will only have lost some of the imported drawings, which you can then simply re-import. After recovering the model you may want to check the Layers window to see what imported files are missing.
If the design model portion of the file is also incomplete or corrupt then it will not be possible to recover anything. In this situation you will have to resort to recovering from one of the other backup systems in place.