To access the tools for drop-kerbs, driveways and crossing points click the ![]() button.
button.
To create a new drop kerb region click the ![]() button.
button.
As you move the mouse over the Plan View you will see that the chainage selector is in operation on the channels. It is awaiting you to pick the start and end chainage positions on a road channel where you want the dropped part of your dropped kerb item.
When you have selected it's position, the following window is shown:

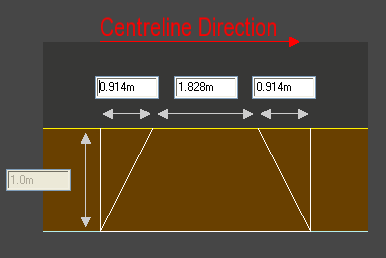
The preview image shows the plan view of the dropped kerb region extending from top of kerb to back of footpath.
The dimensions of the dropped kerb region can be edited directly on the preview. This includes the length over which the level changes (up or down) and the length for which the changed level extends. If you lengthen or shorten the dropped kerb region directly on the preview, it's length will be adjusted equally either side of the middle of the item.
When the option for Full Path Depth is deselected you can enter how far back the grading extends from the channel into the footpath.
The centreline chainage represents the mid-point along the dropped kerb feature. The dropped kerb extends equally along the kerbline either side of this chainage. You can respecify the chainage using the Pick button if required. This will then allow you to pick the start and end chainages of the drop kerb.
The height of the kerb upstand determines the amount of drop of the kerb from the original kerb height. The kerb upstand is the height of the dropped kerb above the channel. If zero, then the kerb will be dropped flush with the channel at the edge of the carriageway. Normally, a small upstand is desirable to prevent water flowing off the carriageway onto the footpath.
By default the drop kerb feature is added to both sides of the road, as is common for a pedestrian crossing. However, if you are designing a residential driveway you may only want it on one side of the road. This can be done by simply unticking Add to both sides of the road.
By default the dropped kerb feature grades all the way from the kerb line to the back of the footpath. However, by deselecting the Full Path Depth option you can specify the distance back from the kerb line over which the grading occurs.

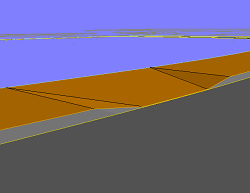
In this example, the grading occurs over a depth of 1.5m back from the kerb line.
This example shows the dropped kerb item graded right to the back of the footpath.
This example show the drop kerb grading extending back over about half the footpath width.
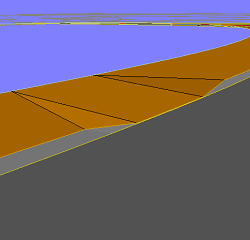
By default the drop kerb item is wider at the kerb line than at the back on the footpath, as shown in the above images.
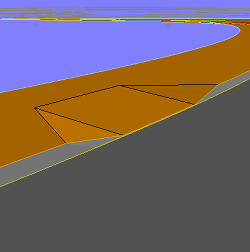
But, if you select the Rectangular style then the width at the back on the footpath will match the full width at the kerb line.
The rectangular style looks like this on the 3D view.
By default the drop kerb feature extends back perpendicular to the kerb line.
However, sometimes the kerb line does not run parallel to the centreline, for example, where the road is widening, or at a junction kerb return splay. Normally, it is desirable for a pair of crossing points to guide the pedestrian to cross straight over the road (perpendicular to the centreline).
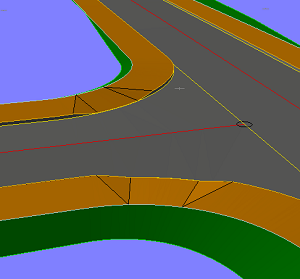
This example shows a pair of crossing points at a road junction which are not perpendicular to the road centreline. They are aligned relative to the kerb line which is diverging at this point.
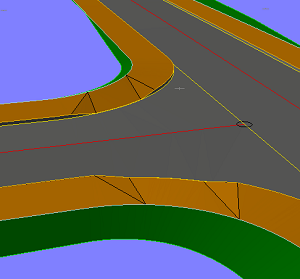
This example shows the same crossing points aligned perpendicular to the road centreline, so as to guide pedestrians straight across the road.
To modify the properties of a drop kerb item click the ![]() button.
button.
As you move the cursor over the plan view the nearest drop kerb item will highlight. Click to select. The same window will be shown as for adding a new drop kerb (as above), but with all the properties filled out. Make any required changes, as above, and then click the OK button.
Whereas when adding a new drop kerb item you can add a pair on both sides of the road at the same time, when modifying you select only one side at a time, allowing each one to have individual properties.
To delete a drop kerb item click the ![]() button.
button.
As you move the cursor over the plan view the nearest drop kerb item will highlight. Click to delete when the requisite item is highlighted.
Note: The Undo facility can be used if you change your mind after deleting a drop kerb.