The Printing/Plotting facility is accessed is from the Print/Plot... option on the File menu, or with the Plot ![]() toolbar button.
toolbar button.
This feature prints the selected view to your printing device. So, if you want to print a plan drawing, click in the Plan View before selecting the printing facility. To print a long-section, select the Longsection View. Similarly, you can print the 3D View and the Cross-Section View.
The Plot Setup window shows a preview of exactly what you'll get on the printer.
Note: You can pan and zoom the preview image with the mouse, to position the drawing on the paper.
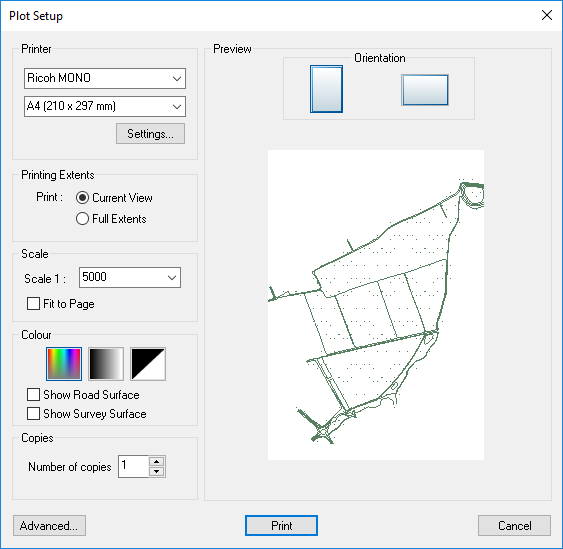
Choose the printer from the drop-down list of available printers, then choose the desired paper size for the drawing.
Note: If you have a PDF printer installed (for example, CutePDF Writer) you can produce PDF files of your drawings by selecting it as the printer.
Choose the desired paper orientation by clicking the Portriat or Landcape symbol above the preview. The preview will update to show what would be printed on the paper.
By default the print preview shows the same drawing region that is on the Current View.
Selecting Full Extents previews the whole drawing to its full extents.
Note: You can still reposition the preview using the normal Pan and Zoom mouse operations.By default Fit To Page is active and the initial scale is shown so that the region in the current view fits on the paper.
You can deselect Fit To Page and choose a pre-set scale from the drop down menu or type in a specific scale. The preview window shows what you'll get on the paper.
Note: Zooming with the mouse in the preview will change the selected scale setting.
There are three output colour options:
Click the appropriate button and the preview window will update.
You can also choose whether the road surfaces and survey surfaces should be shown by selecting the Show Road Surface and Show Survey Surface options.
Alter the Number of Copies to choose how many copies are to be printed/plotted.
These two buttons allow you to choose Portrait or Landscape paper orientation. The preview will update as soon as you click on the desired paper orientation.
The Advanced button shows a window with some printing options that are generally not required to be changed.
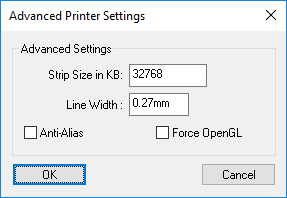
When sending plot files to the printer using OpenGL, the image is processed in strips. This setting allows you to choose the amount of data used for each strip. If your printer is struggling to receive each strip you can try to reduce the strip size. Default: 32768KB (32MB).
A standard line width is used for the printed drawing. If your plots are coming out too light or too dark, you can try increasing or decreasing the line width. Default: 0.27mm
By default, the printed lines are not smoothed, so as to keep the output crisp and clean. However, you can enable line edge smoothing by selecting Anti-Alias.
By default drawings are sent to the printer using vector geometry to give crisp clean lines, unless the particular view contains features which require more advanced graphical rendering, in which case OpenGL is used automatically.
For example, the 3D View requires OpenGL processing, but the Plan View can usually be sent to the printer with vector graphics.
In general, printing a line drawing with vector geometry is quicker and produces the best quality for the lines.
Here you have the choice to force OpenGL graphical rendering even for line drawings. Default: Off.