This option is for defining the cross-sectional profile of the road, along its centreline path, by specifying the road width, kerb height and footway width, along with their associated gradients.
You can change the road profile at any time during the design process. Site3D will work out all the knock-on effects and update your site accordingly.
On the ![]() road tools toolbar, click the
road tools toolbar, click the ![]() add channels button.
add channels button.
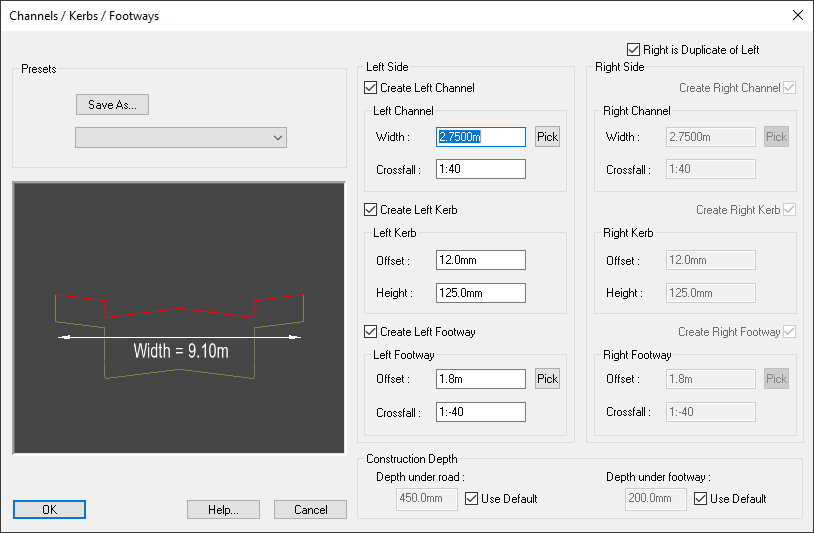
This window contains the dimensions for both the left and right sides of the road. By default the left and right are mirrored. If you want to put in different dimensions for each side then untick the Right is Duplicate of Left box.
A preview diagram of the road profile is displayed showing the design that the given dimensions represent. The preview is shown with a vertical exaggeration of 5 times, so that the grade directions can be seen.
The channel width is the carriageway width from the road centreline to the bottom of the kerb. The combined left and right channel widths define the whole road width between the two kerbs. For example, having both channel widths set to 3.0m will give a 6m wide road.
You may need your road design to vary in width along its length, or to have localised parking bay widenings. Those features can be defined later with the Channel Tools. The widths given on this window will set the initial parallel channel road width, upon which the Channel Tools will operate.
The channel crossfall defines the gradient slope across the road, from the centreline to the bottom of the kerb. A positive value (for example, 1:40) means the carriageway slopes down from the centre to the channel. A negative value (for example, 1:-40) mean the carriageway slopes up from the centre to the channel.
The default is for the centre to be higher than both channels. If you require a road which crossfalls all the way from one channel to the other (i.e. a constant slope across the whole road width) then give a positive crossfall on one side and a negative crossfall on the other.
If you require your road to change its crossfall along its length then you can do that after, with the Channel Tools.
The kerb shape is specified by height and horizontal offset from the channel line to the top of the kerb. The offset is usually very small as kerbs are normally steep sided.
If necessary, you can give a zero offset (for a vertical kerb). Site3D will cope with vertical features, but it is recommended, wherever possible, to specify some offset.
The footway width is the width from the channel line to the back of the footway (i.e. the kerb offset is absorbed into the footway width).
The footway crossfall defines the gradient of slope from the top of the kerb to the back of the footway. The gradient is negative by default (e.g. 1:-40) so that the slope is down towards the road channel.
You may need your footways to vary in width along their length. That can be defined later with the Channel Tools. The widths given on this window will set the initial parallel footway widths, upon which the Channel Tools will operate.
The construction depth under the road and footways can be specified. These values are used in the volume calculations. The cut and fill volumes are calculated relative to the construction depth below the road surface.
If the Use Default box is ticked, the construction depth will use whatever value is set as the default construction depth, even if the default construction depth values are changed. You can untick this box to manually specify the construction depth. The default values can be changed in the Formation Surface Properties or Configuration Settings.
The construction depth required below a footway will generally be less than that required below the vehicular road surface. Values for both depths can be specified. The construction depths are shown diagrammatically on the preview image.
Note: The 5 times vertical exaggeration on the preview will make the depths appear visually greater than they actually are.
You can save your road cross-sectional profile as a template for quickly repeating the same properties on other roads.
Use the Save As button to store the currently display values as a preset template.
You will be asked to give a name for the new road profile, and then it will be available on the drop-down list for selection thereafter.
When you select an item from the drop-down list of presets, all the items on the window will be filled-out with the preset values.