The Swept Path Analysis toolbar has tools for analysing the swept paths of vehicles.
To access these tools click the ![]() button.
button.
You will see this toolbar appear on the top left of the plan view window:


![]() Create a new vehicle swept path
Create a new vehicle swept path
![]() Delete a swept path
Delete a swept path
Clicking on this button will open the Vehicle Chooser window where you can select a vehicle to create a swept path from.
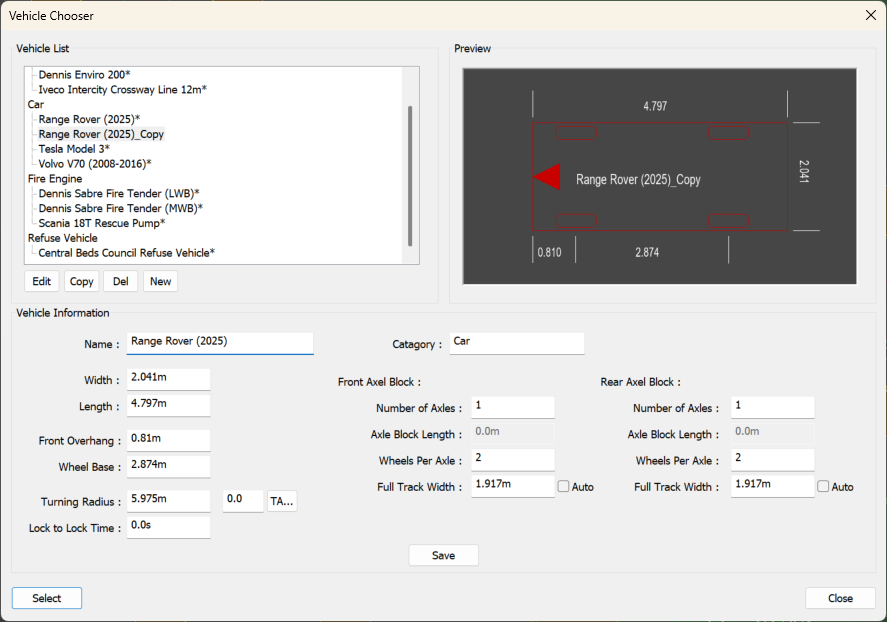
From the vehicle list at the top left you can click to select one of default vehicle definitions and then use this to create a swept path for by pressing the Select button.
After pressing the Select button with a vehicle selected from the vehicle list you can then place this in the project. Move the mouse around the project and click to set the initial position of the vehicle.
Then you can set the initial orientation of the vehicle by moving the mouse to the desired rotation and then clicking to set this.
Then you can can set the next possible position of the vehicle, this will be limited to the maximum turning radius of the vehicle. A swept path between the two positions will be calculated as you move the mouse. Clicking will lock this in and allow you to set the next path position.
Pressing the Close button will close this window and exit the New Swept Path tool.
Clicking the Edit button will enable all of the edit boxes below allowing you to make changes to the selected vehicle's dimensions. Please note that you cannot edit vehicles from the default vehicle packs. These vehicles are indicated with a "*" at the end of the vehicle name in the selection list at the top left. If you wish to make changes to a vehicle from the default pack, please copy it first and edit the copy.
The Save button is only available when you are editing a vehicle. If you make changes, click the Save button to store the changes in the current vehicle. The dimension edits will then grey out indicating you can't make any further changes.
Press the Copy button to make a duplicate of the currently selected vehicle. It will add the new copy into the selection list with "_Copy" at the end of the vehicle name.
Pressing the Del button will remove the current selected vehicle from the vehicle selection list. You cannot delete a vehicle from the default vehicle pack.
Click the New button and a new vehicle will be added to the list. It will also enable the dimension edit boxes ready for you to start setting up the new vehicle.
When setting a vehicle Name, it must be unique to distinguish it from all other vehicles in the list.
You can type in a name for the vehicle's Catagory. This name will be used to group vehicles of the same catagory to gether in the selection list above.
The vehicle's Width and Length specify the overall vehicle bounding box to be tracked.
The Front Overhang is the distance measured from the front of the vehicle to the centre of the Front Axel Block.
The Wheel Base is the distance measured from the centre of the Front Axel Block to the centre of the Rear Axel Block.
The vehicle's Turning Radius is the kerb to kerb turning radius measured in metres. This is the smallest distance from the outside edge of the outer front wheel that the vehicle can make when turning at full lock. There will likely be parts of the vehicle body that overhang slightly beyond this. Typing in a Turning Angle and clicking the TA button will use the vehicles current information to calculate a Turning Radius from the TA value.
Lock to Lock Time is the time in seconds it takes to safely turn the steering wheel from its left most position to the right most position.
Number of Axles for the front and rear is number of axles in either the front or rear. For example a car typically has one axle at the front and one axle at the rear whereas a lorry might have one axle at the front but two axles at the rear.
If the vehicle has more than one axle at the front or rear, the Axle Block Length edit will enable. Please specify the distance from the centre of the first axle in this block to the centre of the last axle in this block.
Wheels Per Axle is the number of wheels on each axle in this block. For example, a car will have two wheels on the front axle (one of the left and one on the right) but a lorry might have four wheels on each rear axle (two on the left and two on the right) to help spread weight.
Full Track Width is the distance from the outer edge of the left most wheel on the axle and the outer edge of the right most wheel on the same axle. Ticking Auto will mean the Full Track Width is set as the vehicle's bounding box width.
After clicking on this button you can then move the mouse around to highlight the closest vehicle swept path that has been generated. Click to delete the highlighted vehicle swept path.