The House Template tools are used to create a new house type, or to modify a house type.
To create a new house type:
To modify a house type:
You will see this toolbar appear on the top left of the plan view window:


Note: The big ![]() button indicates which type of options the toolbar is for.
Moving the mouse over this big button also restores the visibility of the toolbar when it has hidden itself (The toolbar will slide out of view after a period of inactivity).
button indicates which type of options the toolbar is for.
Moving the mouse over this big button also restores the visibility of the toolbar when it has hidden itself (The toolbar will slide out of view after a period of inactivity).
Note: If defining a new house type, all the buttons will initially be inactive except for the Start New Wall button. An outer wall is required.
Note: If modifying a house type, the Start New Wall button is inactivce, as it will already have its outer wall.
Note: When defining a house template, all other drawing features are faded to make it easier to see the house you are working on.
The house template tools allow you to define the outer wall of the house and set positions of levels, annotation, doors, drainage and other service connections.
![]() Start the Outer Wall
Start the Outer Wall
![]() Add a Point into the Wall
Add a Point into the Wall
![]() Add or change a curve
Add or change a curve
![]() Move a Point on the Wall
Move a Point on the Wall
![]() Delete a Point from the Wall
Delete a Point from the Wall
![]() Add Door
Add Door
![]() Add Drainage Connection
Add Drainage Connection
![]() Add Utility Connection
Add Utility Connection
![]() Add Annotation
Add Annotation
![]() Edit House Item Properties
Edit House Item Properties
![]() Set Insertion Point
Set Insertion Point
![]() Set Insertion Rotation
Set Insertion Rotation
![]() Delete Annotation or Symbol
Delete Annotation or Symbol
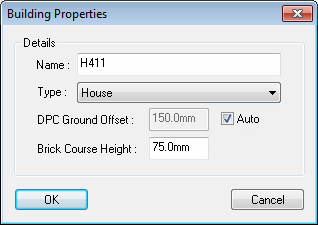
![]() House Properties
House Properties
![]() Finish and apply the changes to the template
Finish and apply the changes to the template
A house template must have the outer wall defined. Click round the outer wall positions on the plan view. Use the snap tools and the construction line tools for accuracy. Right-click and select the Finish option to close the outer wall line.
You can add, move and delete wall points using the ![]() ,
, ![]() and
and ![]() options, and you can add a curved section of wall using the
options, and you can add a curved section of wall using the ![]() option.
option.
First choose which type of door you are specifying:
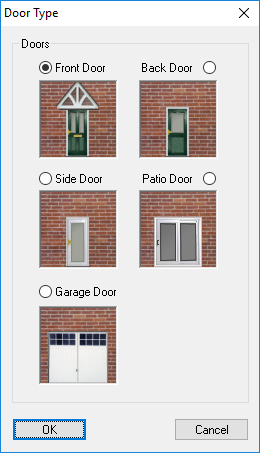
Then use the mouse to position the door - it will be locked onto the outer wall. Click to place the door.
Front doors automatically have a landing created once the house is inserted onto the drawing. These
are intended as a flat or shallow graded pad outside the door levelled to the house FFL for level access.
A landing's width, grade and depth can be modified per house by using the ![]() Edit House Item Value tool.
Edit House Item Value tool.
First choose which type of drainage connection you are specifying:

Then position the drainage connection symbol in the required location on the house.
First choose which type of utility connection you are specifying:
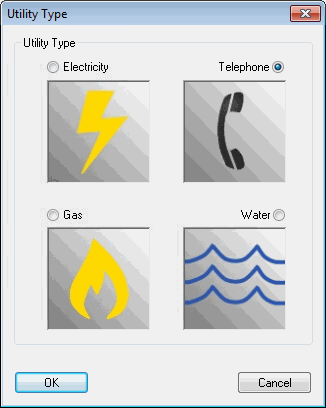
Then position the utility connection symbol in the required location on the house.
First choose which type of annotation you are specifying:
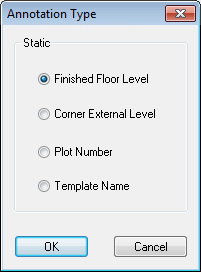
Then position the annotation text in the required location on the house.
Then specify the desired rotation of the annotation text by moving the mouse around the insertion point. The text will rotate with the mouse, snapping to 5 degree intervals. Click to set the angle.
Use this option to modify the properties of external levels, doors or service connections. This will set the default item properties that are adding the template to the project. These properties can be overridden per house once inserted into the project.
Any editable item within a house will highlight as you move the mouse near. Click to select the item and modify its properties.
Choose a position on the building template that will be used as the insertion point when inserting this building onto the drawing.
Select which wall of the building template should be considered to be the front of the building. This will then ensure the building is shown with a standard rotation when first inserted on a drawing.
As you move the mouse over the house template, the nearest annotation item or service connection symbol will highlight. Click to delete the highlighted item from the template.
When you have finshed defining and making changes to the house template, click this button to come out of the house template options. The rest of the plan view will re-display at normal brightness, and any houses on the drawing whch are of this type will update to reflect the changes to their template.
Right click whilst editing or creating a house template to show the menu below.
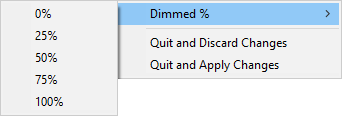
From here you can choose the prefered level of background dimming, ranging from 0% for full colours to 100% to effectively hide all layout lines.